How to Set Up Obsidian as a Second Brain (and Plug It Into Your AI Agent)
A non-developer's guide to setting up Obsidian as your personal knowledge base — from installation to graph view to connecting it with Claude AI via MCP. No coding required. Just folders, links, and a system that actually works.
More in Working with AI
- RAG vs. the LLM Wiki: Two Ways to Give an AI Memory
- How to Prove a Fine-Tune Actually Reduced Hallucination — Not Just Memorized Your Test Set
- How to Fine-Tune a Local LLM on an Apple Silicon Mac (MLX + LoRA, the Actual Commands)
- Why one benchmark won't tell you the best coding LLM in 2026 — and which three together actually do
- Designing Frontends Claude Can Actually Use — A 7-Step Field Guide
I used to keep notes everywhere.
Google Docs for meeting notes. Apple Notes for random thoughts. Notion for project tracking. Sticky notes on my monitor for things I'd definitely forget. A text file on my desktop called important_stuff_FINAL_v3.txt.
You know the feeling. You know you wrote something down about that API key, or that design decision, or that one blog post idea you had at 2am. But where? Which app? Which folder? Was it in the "Work" notebook or the "Ideas" notebook or did you just text it to yourself?
One day I spent 25 minutes looking for a note I wrote that same week. That's when I decided my note-taking system wasn't a system. It was a junk drawer with a search bar.
Then I found Obsidian. And everything changed.
What Is Obsidian? (The 30-Second Version)
Obsidian is a note-taking app where every note is a plain text file stored on your computer.
That's it. That's the core pitch.
No cloud database you can't control. No proprietary format that locks you in. No subscription required for basic features. Just .md (Markdown) files in a folder. You can open them with any text editor. You can back them up however you want. If Obsidian disappears tomorrow, your notes are still there.
But what makes Obsidian special isn't the storage format. It's the links.
Every note can link to any other note with a simple [[double bracket]] syntax. Over time, these links create a web of connected knowledge — your own personal Wikipedia. And Obsidian visualizes this web as a graph view, which looks like this:
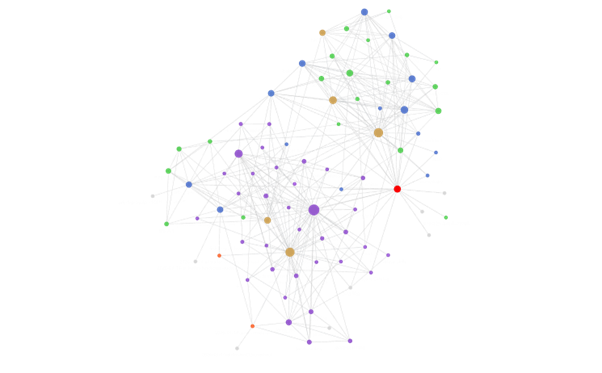
Every dot is a note. Every line is a connection. The big dots are notes with lots of links — they're the hubs of my knowledge system. The colors represent different categories (projects, resources, areas, concepts).
It looks cool. More importantly, it works. When I write a note about "Claude MCP setup," I link it to "Obsidian plugins," "AI workflows," and "project automation." Six months later, when I search for any of those topics, the related notes surface automatically. No manual organizing required.
The difference from other note apps: Google Docs stores documents. Notion stores databases. Obsidian stores connections between ideas. That's the "second brain" concept — not just remembering things, but understanding how they relate to each other.
Step 1: Install Obsidian (2 Minutes)
Go to obsidian.md and download the app. It's available for Windows, Mac, Linux, iOS, and Android. The desktop app is completely free. Mobile is free too — only Obsidian Sync and Publish are paid services (and you don't need either to start).
Install it. Open it. You'll see a screen asking you to create or open a vault.
What's a Vault?
A vault is just a folder on your computer. That's all. Obsidian calls it a "vault" to sound fancy, but it's literally a folder where your notes will live.
My recommendation: Create a folder somewhere accessible. I use C:\ObsidianVault on Windows. Some people use ~/Documents/ObsidianVault. Pick any location you'll remember.
Click "Create new vault," give it a name, choose the folder location, and you're in.
Sync between devices? You have options:
- Obsidian Sync ($4/month) — official, end-to-end encrypted, works perfectly
- Google Drive / iCloud / Dropbox — free, put your vault folder inside a synced folder
- Git — free, more technical, good if you're already using GitHub
I use Google Drive. My vault folder is inside my Google Drive, and it syncs across all my devices automatically. No extra cost. The one caveat: don't open the same note on two devices simultaneously, or you might get sync conflicts.
Step 2: Understand the Basics (5 Minutes)
Before changing any settings, let's understand three concepts that make Obsidian click.
Concept 1: Notes Are Files
When you create a note in Obsidian, it creates a .md file in your vault folder. You can see these files in Windows Explorer or Mac Finder. They're regular text files.
This means:
- You can back them up like any other file
- You can edit them in any text editor (VS Code, Notepad, whatever)
- You'll never lose them to a service shutting down
- You own your data completely
Concept 2: Links Are Everything
The magic of Obsidian is [[wiki-style links]]. Type [[ in any note, and Obsidian suggests existing notes to link to. Select one, and you've created a bidirectional connection.
Bidirectional means: if Note A links to Note B, then Note B automatically knows about Note A. You don't need to manually add the link in both directions. Obsidian tracks this for you.
This is the single most important feature. Use it aggressively. Link everything that's related. Over time, patterns emerge that you didn't plan.
| Instead of... | Do this... |
|---|---|
| Writing isolated notes | Link every note to at least 2 others |
| Creating rigid folder hierarchies | Use links + tags for flexible organization |
| Searching through folders | Follow the link trail |
| Duplicating information | Link to the original note |
Concept 3: Markdown Is Just Formatted Text
Obsidian notes use Markdown, which is a simple way to format text:
# This is a heading
## This is a smaller heading

**This is bold**
*This is italic*

- This is a bullet point
- Another bullet point

> This is a quote

[[Link to another note]]
That's 90% of what you'll need. Obsidian shows you a formatted preview as you type, so you don't need to memorize the syntax. Just type naturally and use the toolbar.
Step 3: Settings to Change Immediately
Open Settings (Ctrl + , or Cmd + ,). Here are the changes I recommend making right away:
Editor Settings
| Setting | Change To | Why |
|---|---|---|
| Default editing mode | Live Preview | Shows formatting as you type (best of both worlds) |
| Spell check | On | Catches typos in real-time |
| Readable line length | On | Prevents lines from stretching across ultra-wide monitors |
| Show frontmatter | On | Useful later when you add metadata to notes |
Files & Links Settings
| Setting | Change To | Why |
|---|---|---|
| Deleted files | Move to system trash | Safety net — you can recover accidentally deleted notes |
| Default location for new notes | In the folder specified below → "Inbox" | New notes go to one place, not scattered everywhere |
| Default location for new attachments | In subfolder under current folder | Keeps images organized next to their notes |
| Use [[Wikilinks]] | On (default) | The backbone of Obsidian — don't turn this off |
Appearance
| Setting | Change To | Why |
|---|---|---|
| Theme | Your preference | Default is fine. I use "Minimal" from the community themes |
| Font size | 16-18px | Default 14px is small for long reading sessions |
Pro tip: Create an "Inbox" folder in your vault right now. Every new note starts there. Once a week, sort your Inbox into proper folders. This prevents the "where should I put this?" paralysis that kills note-taking habits.
Step 4: Essential Community Plugins
Out of the box, Obsidian is already solid. But community plugins turn it from "good note app" into "second brain engine." Here's how to enable them and which ones to install first.
Enabling Community Plugins
- Open Settings → Community plugins
- Turn off Restricted mode (you'll see a warning — community plugins from the official Obsidian directory are reviewed before listing, but you should still review the plugin source for plugins that access sensitive data)
- Click Browse
The Must-Have Plugin List
I've tested dozens. These are the ones I actually use every day:
1. Calendar
What it does: Adds a calendar view to your sidebar. Click any date to create or open a daily note.
Why you need it: Daily notes are the easiest way to start using Obsidian. Every day, write what you're working on, what you learned, what's on your mind. Link to relevant project notes. Over time, you'll have a searchable journal of your entire work history.
Setup: Install → Enable → Create a "Daily Notes" folder → Set it as the daily note location.
2. Dataview
What it does: Lets you query your notes like a database. Write a simple query, get a table of results.
Why you need it: Once you have 50+ notes, you'll want ways to surface specific information. Dataview lets you write things like "show me all notes tagged #project that I created this month" and get a live table.
Example:
```dataview
TABLE date, tags
FROM "10-Projects"
WHERE status = "active"
SORT date DESC
```This looks intimidating, but the syntax is simpler than it appears. Start with the examples in the plugin docs and modify them.
3. Templater
What it does: Lets you create note templates with dynamic content (dates, prompts, file names).
Why you need it: Consistency. When every project note has the same structure, finding information later is effortless. Templater fills in the boilerplate so you focus on content.
My project template looks like this:
---
status: active
priority: 1
created: {{date}}
path: ""
next-action: ""
tags: [project]
---

# {{title}}

## Goal
[What is this project trying to achieve?]

## Current Status
[What's happening right now?]

## Decisions Log
| Date | Decision | Reasoning |
|---|---|---|

## Links
- Related: [[]]
4. Quick Switcher++ (or the built-in Quick Switcher)
What it does: Ctrl + O opens a search bar that finds any note by name instantly.
Why you need it: As your vault grows, navigating folders becomes slow. Quick Switcher is faster — type a few letters, hit Enter, you're there. I use this 50+ times a day.
5. Graph View (Built-in, But Configure It)
The graph view is built into Obsidian — no plugin needed. But the default settings show everything at once, which becomes a mess with 50+ notes.
How to make it useful:
- Open graph view:
Ctrl + G - Click the settings gear icon in the graph view
- Turn on color groups — assign colors to different folders or tags
- Adjust link distance and repel force until nodes are readable
- Use filters to focus on specific areas
My color groups:
| Folder/Tag | Color | Meaning |
|---|---|---|
10-Projects/ |
Blue | Active projects |
20-Areas/ |
Purple | Ongoing areas of responsibility |
30-Resources/ |
Green | Reference material |
MOC-*.md |
Orange | Map of Content hubs |
| Orphan notes | Gray | Notes with no links (fix these!) |
This is how you get from "random dots" to the organized graph you saw earlier. The colors aren't just pretty — they reveal structure. If you see a cluster of blue dots connected to purple and green, that's a healthy project supported by areas and resources. A lone gray dot in the corner? That's a note you forgot about.
Step 5: Build Your Vault Structure
Don't overthink this. You can always reorganize later (that's the beauty of links over folders). But having a starting structure prevents chaos.
The PARA Method (What I Use)
I use a modified version of Tiago Forte's PARA method:
My Vault/
  00-Active-Context.md    ← "What am I focused on right now?"
  HOME.md                 ← Dashboard with links to everything
  10-Projects/            ← Things with a deadline or goal
  20-Areas/               ← Ongoing responsibilities (no end date)
  30-Resources/           ← Reference material, concepts, techniques
  40-Archive/             ← Completed or inactive projects
  Inbox/                  ← New notes land here, sorted weekly
  Daily Notes/            ← One note per day
  Templates/              ← Note templates (Templater)
Why the numbered prefixes? They control the sort order in the sidebar. Projects (what you're actively doing) appear first. Archive (stuff you're done with) appears last.
The most important file: 00-Active-Context.md
This is the single entry point to my entire vault. It answers one question: "What should I focus on right now?"
Mine looks like this:
# Active Context

## Current Focus
| Project | Status | Priority | Next Action |
|---|---|---|---|
| Vibed Lab | Active | 1 | Write Obsidian blog post |
| CryptoBacktest | Active | 2 | Fix mobile layout |
| PK-Swift | Paused | 3 | Waiting for API approval |

## Recent Decisions
- 2026-03-15: Chose Google Drive over Obsidian Sync (cost)
- 2026-03-12: Standardized all project notes with frontmatter

## Blockers
- None currently
When I sit down to work, I open this file first. It tells me exactly where I left off. No "what was I doing?" moments. No scrolling through 40 notes trying to remember context.
This becomes incredibly powerful when you connect Obsidian to AI. More on that in a moment — and if you want the deeper version of this idea, I wrote about turning an Obsidian vault into an LLM agent's wiki separately.
Step 6: The Link-First Workflow
Here's the workflow that transformed my note-taking from "I should write this down" to "my vault already knows this."
The Daily Flow
Morning:
- Open today's daily note (click the date in Calendar plugin)
- Write 2-3 sentences about what you're focusing on today
- Link to relevant project notes:
Working on [[Vibed Lab]] blog post about [[Obsidian]]
During work:
- Have a thought or learn something? Write it in the daily note
- If it belongs in a project, link to that project and add it there too
- If it's a new concept, create a note in
30-Resources/
End of day:
- Review your daily note
- Add any missing links
- Update
00-Active-Context.mdif priorities changed
The Weekly Review (15 Minutes)
Every Sunday, I spend 15 minutes on vault maintenance:
- Sort Inbox: Move notes from Inbox to proper folders
- Fix orphans: Open graph view, find gray dots, add links
- Update Active Context: Remove finished tasks, add new ones
- Create missing links: Read recent notes, link anything related
This 15 minutes per week is the entire maintenance cost. The vault grows organically through daily use, and the weekly review keeps it tidy.
Step 7: Connect Obsidian to Claude AI via MCP
This is where it gets really interesting.
If you're using Claude Code (Anthropic's CLI tool for developers) or Claude desktop app, you can connect Obsidian directly to it using the Model Context Protocol (MCP). This means Claude can read and write your Obsidian notes, essentially giving your AI assistant access to your second brain.
What Is MCP?
MCP (Model Context Protocol) is a standard that lets AI models connect to external tools and data sources. Think of it as a USB port for AI — plug in Obsidian, and Claude can see your notes. Plug in Notion, and Claude can see your tasks. Plug in GitHub, and Claude can see your code.
Why Connect Obsidian to Claude?
Here's what becomes possible:
1. Instant Context Recovery
Without MCP:
"Hey Claude, I'm working on the Vibed Lab project. Last time we discussed changing the blog layout and decided to use a grid view instead of a list. The decision was based on..."
You spend 5 minutes re-explaining what Claude already helped you with last session.
With MCP:
"Hey Claude, read my Active Context and project notes."
Claude reads 00-Active-Context.md, sees your current focus, reads the relevant project note, and instantly knows: the project status, recent decisions, what to do next, and any blockers. Zero re-explanation needed.
2. Knowledge-Grounded Responses
Without MCP, Claude answers based on its general training data. Your preferences, your architecture decisions, your naming conventions — it doesn't know any of that.
With MCP, Claude reads your 30-Resources/ notes before answering. If you've written a note about "My Coding Conventions" or "Architecture Decisions for Project X," Claude will follow your standards, not generic best practices.
Real example: I have a note called "Obsidian vs Notion 역할 분담" (Role Division) that explains: Obsidian is for knowledge (why/how), Notion is for tasks (what/when). When Claude plans work, it automatically puts technical docs in Obsidian and task tracking in Notion — because it read my note and understood my system.
3. Automatic Documentation
After a work session, Claude can update your Obsidian notes automatically:
- Project status changed → update the project note
- Discovered a debugging pattern → write it in
30-Resources/ - Made an architecture decision → add it to the decision log
- New project started → create a standardized note in
10-Projects/
I no longer manually update my project notes. Claude does it as part of every work session. The vault stays current without extra effort from me.
4. Cross-Session Continuity
This is the killer feature. Imagine this flow:
Session 1 (Monday):
  Claude reads Active Context → works on feature → updates project note
  → writes "Next: fix the mobile layout" in the project note

Session 2 (Wednesday):
  Claude reads Active Context → sees "fix mobile layout" as next action
  → picks up exactly where Session 1 left off
No handoff document. No "remind me what we were doing." The Obsidian vault is the continuity layer. Every Claude session starts by reading one file and immediately has full context.
This is the real power of the Obsidian + AI combination. Your second brain isn't just for you anymore — it's for your AI assistant too. And since the AI can both read and write notes, the system maintains itself. (This is also the backbone of how I run a fully autonomous AI agent — the vault is the memory it reads and writes between sessions.)
How to Set It Up
Option A: Claude Code (CLI)
If you're using Claude Code, install the Obsidian MCP server:
claude mcp add obsidian -- npx -y @mauricio.wolff/mcp-obsidian /path/to/your/vaultReplace /path/to/your/vault with your actual vault path (e.g., C:\ObsidianVault on Windows).
Note: This is a community package — official alternatives may exist. Check the package's repo, recent commits, and security history before installing in environments with sensitive data.
That's one command. After this, Claude can use tools like:
read_note("00-Active-Context.md")— read any notewrite_note("10-Projects/new-project.md", content)— create or update notessearch_notes("keyword")— search across your entire vault
Option B: Claude Desktop App
For the Claude desktop app, you need to edit the MCP config file:
Windows: %APPDATA%\Claude\claude_desktop_config.json
Mac: ~/Library/Application Support/Claude/claude_desktop_config.json
Add this to the mcpServers section:
{
  "mcpServers": {
    "obsidian": {
      "command": "npx",
      "args": ["-y", "@mauricio.wolff/mcp-obsidian", "/path/to/your/vault"]
    }
  }
}
Restart the Claude app, and you'll see the MCP tools available in your conversations.
MCP Tips From My Experience
1. Start with Active Context.
Tell Claude: "At the start of every conversation, read 00-Active-Context.md first." This single instruction gives Claude your current focus, priorities, and blockers — all from one file read.
2. Don't let Claude update everything.
Not every interaction needs a vault update. A typo fix? A quick question? Don't save those. My rule: "Would the next session's Claude repeat a mistake without this information?" If yes, save it. If no, skip it.
3. Separate knowledge from tasks.
I use Obsidian for knowledge (architecture decisions, debugging patterns, strategies) and Notion for tasks (to-do items, deadlines, progress tracking). Claude writes to both — knowledge to Obsidian, task updates to Notion. No duplication.
4. Use frontmatter for machine-readable metadata.
When Claude reads a project note, frontmatter tells it everything at a glance:
---
status: active
priority: 1
path: "D:/coding/vibed-lab-next"
next-action: "Write obsidian setup guide"
tags: [project, web, blog]
created: 2026-01-15
---
Claude parses this instantly. No need to read the entire note just to check if a project is active.
Step 8: Advanced Patterns (Once You're Comfortable)
These are patterns I've developed over months. Don't try to implement all of them on day one. Start simple, add complexity as you need it.
Map of Content (MOC) Notes
When a topic accumulates 5+ notes, create a "Map of Content" hub:
# MOC — AI Tools

## Core Concepts
- [[Claude Code Setup]]
- [[MCP Protocol Explained]]
- [[Prompt Engineering Basics]]

## My Workflows
- [[Jarvis Mode — Autonomous AI Agent]]
- [[Subagent Division of Labor]]

## Resources
- [[Claude API Documentation Notes]]
- [[Obsidian MCP Configuration]]
MOCs are like table-of-contents pages for a topic. They prevent your vault from becoming "lots of notes, no structure."
The Progressive Summarization Technique
When you read something valuable:
- Layer 1: Save the raw highlight or quote
- Layer 2: Bold the most important sentences
- Layer 3: Highlight the key phrases within those sentences
- Layer 4: Write a one-sentence summary at the top
This means every note has multiple "zoom levels." Quick glance → read the summary. Need more detail → read the bold text. Deep dive → read everything.
Atomic Notes
Each note should be about one idea. Not "everything I know about SEO" but "Why meta descriptions matter" and "How Google indexes pages" and "My SEO checklist for new blog posts." Three notes, linked to each other.
Why? Because atomic notes are reusable. A note about "How Google indexes pages" is useful for your SEO project and your blog writing workflow and your client presentation. A monolithic "SEO Notes" file is useful for... scrolling through.
The One Thing You Need to Start
I know this is a lot. Installation, settings, plugins, structure, MCP, workflows — it sounds like a weekend project.
It's not. Here's how to start in 15 minutes:
- Install Obsidian (2 minutes)
- Create a vault (1 minute)
- Create your first note — write what you're working on today (5 minutes)
- Create a second note — write about a related topic (3 minutes)
- Link them — use
[[double brackets]](1 minute) - Open graph view (
Ctrl + G) — see your first two connected dots (1 minute)
That's it. You now have a second brain with two neurons. Tomorrow, add two more. Next week, you'll have twenty. In a month, you'll wonder how you ever worked without it.
The graph gets prettier over time. But more importantly, your thinking gets clearer. Because the act of linking ideas forces you to articulate how things connect. And that's the real superpower — not the tool, but the habit of thinking in connections.
2026.03.17
Written by
Jay Lee
Korea-Licensed Pharmacist (#68652) · Senior Researcher
Korea University, College of Pharmacy (B.S. + M.S., drug delivery systems & industrial pharmacy). Building production-grade AI tools across medicine, finance, and productivity — without a CS degree. Domain expertise first, code second.
About the author →Related posts